Get the perfect partners for your practice

Your lab will always play an integral role in fulfilling complex cases and turning around high volume work. But investing in a digital workflow for your practice, gives you the means to produce your day-to-day appliances, including retainers, mouthguards and whitening trays. You just need the right products, the right tools, and the right partner to help make it happen.https://www.eurodontic.co.uk/
Why bring appliance production in-house?
- Save money – your lab bills will reduce as you transition to in-house appliance production.
- Faster turnaround – producing your appliances in-house gives you control over when your patients’ appliances are made and fitted
- Upskill your team – ensure your team are trained up on the use of the latest technology and see their motivation and job satisfaction increase
- Customer service – with your own machine, you can offer a premium service to your patients, remaking lost or broken appliances and creating relief appliances on the spot
- Traceability – you’re in control of buying your own materials so you can be confident in their quality – you can experiment with different options, rather than being limited to the materials stocked by your lab.
- Streamlined workflow – whether you’re a digital practice or not, you’ll be able to manage the entire process in-house, casting your own impressions or printing your own models from patient files. Your cases need never leave the practice, so you’re in full control of every aspect of production.
What do you need to get started?
If you have or are planning to buy an intraoral scanner, you can take digital impressions from your patients which will then be used to fabricate the appliances using 3D printing technology.
If your practice still takes alginate impressions, you can cast them up and create your appliances using our pressure forming machines and materials.
The right tools for the job
At Eurodontic, we’ve put together a suite of products that work together perfectly, from intraroral scanner, 3D model printing through to building and finishing.
With our ‘perfect partner’ products you have all the machines, tools and materials you need to manage the production process from start to finish, with no snags or delays.
Everything you need to create long-lasting, quality appliances can be found in one place.
Our experienced Eurodontic team are here to advise you on the best workflow solution for your practice. From purchase to installation, Eurodontic will be with you every step of the way.
Providing training and continued support for you and your team, for the life of the equipment.

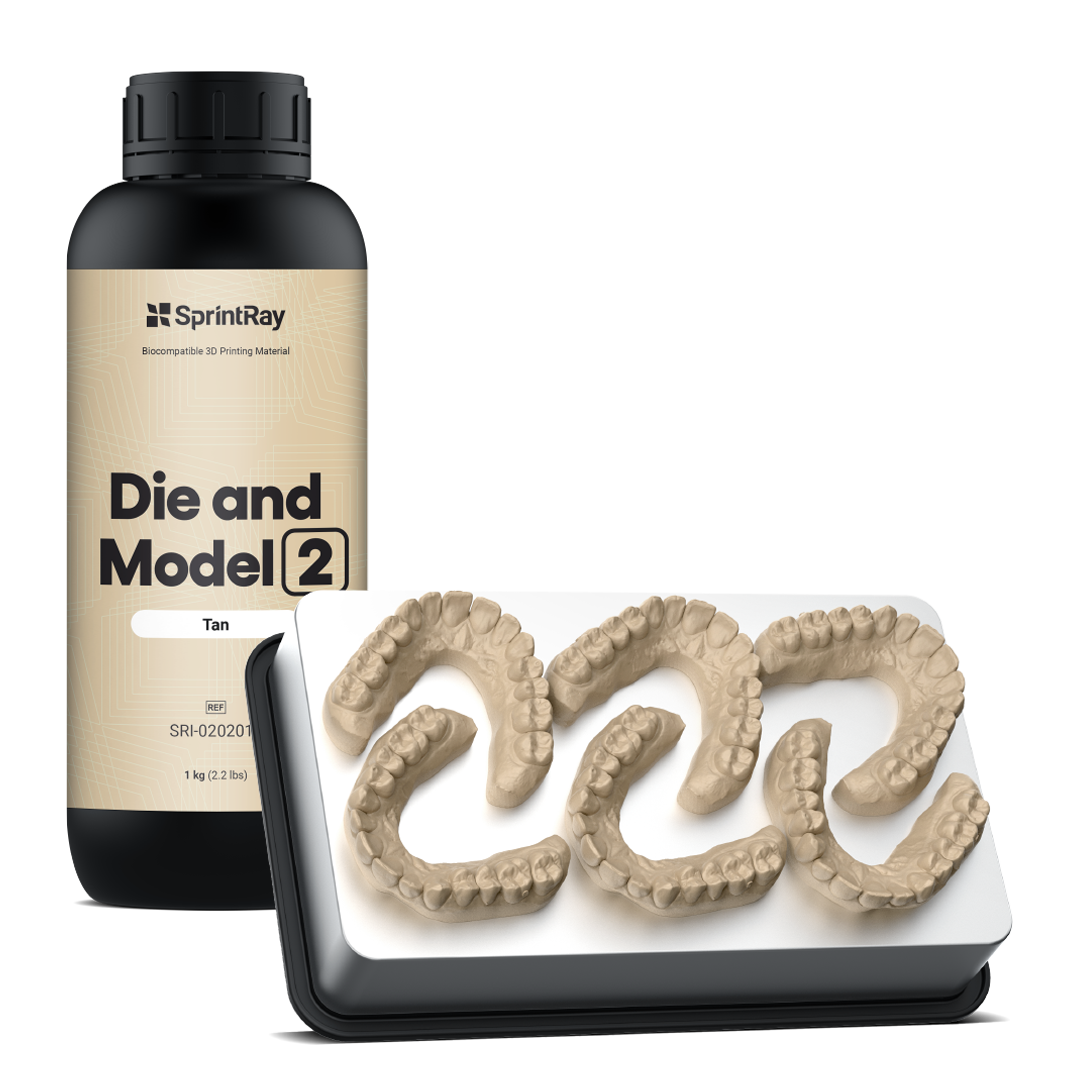
- SPRINTRAY PRO95 S is part of the complete 3D printing ecosystem that also includes cloud-based design and printing software, ProWash 2 automated cleaning system and the world’s most advanced post-curing with ProCure 2
- BIOSTAR® – This versatile pressure moulding machine is suitable for heavy use by busy labs
- MINISTAR® S – offering precise results every time, the Ministar S® is ideal for light to moderate use, and has the same great features as the Biostar®
- Pressure forming materials – high quality, long-lasting materials, ideal for a range of applications
- Finishing products – our range of trimmers and burs give your splints a high quality finish
You’ll find everything you need in our online shop, or alternatively, feel free to contact us for advice on the right workflow solution for your practice.

Important
A manufacturer of medical devices must register with the MHRA (Medicines and Health Regulatory Agency) and must understand and comply with (MDR) Medical Device Regulations.
The regulations stipulate that appliances must be manufactured with acceptable materials and must be signed off by a GDC-registered person.
A manufacturing organisation requires a responsible person who is two years post-qualification and is competent in the area of appliance manufacture.
The team at Eurodontic are now back from the Dental Professionals Conference which took place in Edinburgh last week.
Run by the Orthodontic Technicians Association, the event is a great opportunity for orthodontic teams to get together, network and hear from leading voices in the industry. It was good to see that the OTA is gathering new members and we also saw new faces on the organising committee.
The lectures on offer were varied, informative and interesting. We especially enjoyed Andrea Johnson’s session on pressure forming, which was well-attended and well-received. Best of all, each lecture took place twice, giving delegates the opportunity to see everyone, rather than having to choose.
On the Eurodontic stand, we really enjoyed catching up with old friends and meeting new customers and acquaintances!
Andrea Johnson is Chair and a founding member of the charity Den-Tech, Orthodontic and maxillofacial laboratory manager at Montagu hospital, Mexborough and the current Chair of the Orthodontic Technicians Association (OTA).

We’re proud to be sponsoring her session at this year’s Dental Technology Conference, which takes place in Edinburgh on 27-28 September.
The session, titled ‘Under Pressure – Thermoforming Tips, Tricks and Advice’ will introduce a range of thermoforming techniques using SCHEU equipment and materials, which will be invaluable both for beginners and more experienced technicians alike.
In April 2019, Eurodontic had the privilege of arranging for Andrea to visit SCHEU’s HQ in Iserlohn, Germany.
Here’s what Andrea made of the visit…
‘SCHEU-DENTAL was founded in In 1926 and is still a family-run business. They develop very high quality dental products and services, including a large range of pressure-moulded appliances, sleep medicine and now 3D printing.
It was with this in mind that I embarked on this journey. I have a very well-loved, old and battered Biostar pressure moulding machine in my lab and quite frankly was looking forward to seeing first hand from the experts how this can be used to its maximum potential with the materials developed especially with it in mind.
I arrived in Iserlohn the evening before my scheduled day at SCHEU and was able to have a little wander around the town. It is a very lovely place and full of the character I have come to expect from the German towns I have visited. It has a very ‘olde world’ feel to it with cobbled streets and characteristic buildings cleverly mixed in with the new without spoiling the overall feel.
The following day was a real learning exercise. I was collected from my hotel in the morning by Martin Göllner who is SCHEU’s sales director. We drove the 10 minutes to the company where I was introduced to Martin’s colleague Antji who was my instructor for the day. I was very impressed by Martin and Antji’s English, it was certainly a huge amount better than my German and the hospitality of them both throughout the day was incredibly impressive.

Huge thanks to both Scheu and Eurodontic for your support and the opportunity.’
Don’t forget to book your place at the DPC Conference, to take part in Andrea’s workshop and of course visit the Eurodontic stand!
We’re looking forward to descending on the fabulous city of Edinburgh for this year’s Dental Professionals Conference on 27-28 September.
Hosted by the Orthodontic Technicians Association (OTA) the event features a real mix of sessions covering topics including pressure-forming, digital workflow and infection control as well as an all-important briefing on forthcoming legal changes.

We’re thrilled to be sponsoring one of the key sessions, led by Andrea Johnson, Chair and a founding member of the charity Den-Tech, Orthodontic and maxillofacial laboratory manager at Montagu hospital, Mexborough and the current Chair of the Orthodontic Technicians Association (OTA).
Andrea’s workshop, ‘Under pressure – Thermoforming tips, tricks and advice’ takes place at 10am and 11.15am on Friday 27th September.
During the session Andrea will demonstrate some common thermoforming techniques both to inform and educate those new to thermoforming, as well as offering tips, advice and possible alternative techniques to those with more experience.
She will be using a SCHEU Ministar Pressure Thermoforming Unit and range of SCHEU products to demonstrate these techniques.
We’re very much looking forward to exhibiting at this event. We’ve been supporting the OTA for many years and it’s great to see such a packed line up. Do come and say hello to us on the stand – this promises to be a great show!
Visit https://ota-uk.org/dcp-conference-2019/ for more information.
With spring in the air we’re looking ahead to this year’s Dental Technology Show, which is taking place at Birmingham NEC on 17th May.
One of our highlights will be listening to 3D printing expert, Vanik Kaufmann- Jinoian, who’ll be speaking in the Digital and Innovation Theatre from 1.45pm – 2.30pm.
Afterwards, he’ll be joining us on the Eurodontic stand to answer any further questions. We’ll be showcasing one of the 3D printers he uses – the ASIGA Max.
More about the speaker

Vanik Kaufmann-Jinoian was born in 1958 in Calcutta, India. He grew up in Switzerland in a city close to Basel, where he went to school and qualified as a dental technician.
In the following years he optimised his skills in various dental laboratories in Switzerland, mainly in the fields of ceramics and implantology.
He worked for a period of time for VITA-Zahnfabrik in Bad Saeckingen, Germany as an international trainer. At that time he was the youngest international ceramic demonstrator in the world. He opened his own dental laboratory in 1990 in Liestal, Switzerland, which now has 15 employees and covers all fields of modern dentistry.
Learning by doing
Vanik had a fascination for 3D printing a long time before this technology became popular in the dental field. He was enthralled by the complexity of the technology and its potential to automate processes, optimise precision and ensure reproducibility.
Having identified a lack of suitable 3D printing systems, Vanik Kaufmann decided to build – or let’s say to put together –his own 3D printer. This phase can be best characterised as ’learning by doing’ and took up a great deal of time and money. The number of misprints far surpassed the number of acceptable results – and even these were of dubious quality.
Deep understanding
As soon as the first low-cost 3D printers appeared in the dental sector, he was eager to buy any promising device and developed his own, personal testing system. He started printing huge piles of printed objects, with the machines running virtually around the clock.
Vanik trialled resins and developed processes and applications that had never before been tried, tested or released. More than once, he came up with new perspectives and approaches for product developments.
Throughout the years, Vanik has developed a deep understanding of 3D printing technology and its potential applications. He lectures at major symposiums and is involved with the master technicians school in Switzerland.
In 3D printing technology, Vanik Kaufmann is undoubtedly a true specialist. We’re looking forward to hearing from him.
For more information on the Dental Technology Showcase, visit https://www.the-dts.co.uk/
The issues caused by the withdrawal of Triad Provisional Material (Dentsply) have been well-documented in recent months.
It had been an extremely useful and versatile material for many dental practices and after production was cancelled last year, clinicians were left with the problem of replacing the provisional material.
In the following article, Darin Dichter D.M.D, outlines the case for replacing Dentsply with DURASPLINT® LC, which in his view is the best possible alternative.
Dr. Dichter is a member of the Spear resident faculty, with 20 years of clinical, research and teaching experience, both as a general dentist and as a prosthodontist.
You can find out more about DURASPLINT® LC here.
Now You See It!
Ultra-Clear Surgical Scans Made Simple
Dental implants are an effective solution for patients with compromised dentition. But identifying the correct position for the implants can be problematic.
CT cone beam scan technology will show bone and anatomical features, but not the position of denture teeth relative to the bone and proposed implant sites.
SCHEU Dental have introduced a new product which overcomes this problem. Ideal for use with the SCHEU BIOSTAR® and MINISTAR®, BIOCRYL® Form X is a new, thermoplastic, radio-opaque material, which is fully visible on scans, with an uniform radio-opacity giving ultra-clear tooth shape.

By allowing tooth position to be communicated on CT scan images without painting anything on to the denture or into an overlay, BIOCRYL® Form X simplifies the stent fabrication process and removes the need for labour intensive processes and workarounds.
With BIOCRYL® Form X, an accurate surgical guide can be produced with ease, leading to optimal restorative outcomes for patients.
BIOCRYL® Form X is now available in the UK, exclusively from Eurodontic. Visit the shop to place your order.


At Eurodontic, we’re gearing up for the next Dental Technology Showcase – the UK’s biggest free conference and exhibition for labs and Dental Technicians.
Taking place on 12-13 May at the NEC in Birmingham, this year’s show promises to be every bit as good as previous events, with a world-class speaker line-up, conference programme and a wealth of exhibitors showcasing the latest tools, techniques and products.

Attendees to this free-to-attend, two-day CPD training and education conference and exhibition will be brought up to speed on the latest techniques, treatments, studies and will be able to tailor individual training paths from a comprehensive speaker line-up, hands-on training and live demonstrations.
You’ll also be able to obtain 40 hours of verified CPD during the course of the event, meaning you can secure most of your annual CPD requirements in one go!
You’ll find Eurodontic at Stand H01 – don’t forget to stop by and say hello!
Earlier in 2016, we launched a very special competition to celebrate 90 years of SCHEU-DENTAL and 25 years of Eurodontic.
We were on a mission to find the oldest SCHEU Biostar® pressure forming machine out there.
We were delighted with the response, with many of our customers sending in photos and serial numbers for their old machines.
However, there could only be one winner, and the oldest Biostar® was uncovered in the Department of Oral Surgery and Orthodontics at Stoke Mandeville Hospital in Buckinghamshire. They even had the original instruction booklets!
The machine was manufactured in 1977, and was one of the last Biostar 1 models produced.
It has been well-used ever since, and as recently as 2 years ago, by technicians Julian Myerson and Jal Irani. Its main purpose was to fabricate oral devices to assist spinal injury patients.
Julian and Jal won a brand new Series 7 Biostar with scan facilities and LCD display, as well as a rather lovely winners’ cake!
Congratulations!

Most orthodontic patients will require long-term retention following completion of their treatment. The latest in our series of useful, instructional videos shows you how to use SCHEU DENTAL products to fabricate a retention splint, and demonstrates the following additional techniques:
- Blocking out undercuts using SIL-KITT
- Using an Isofolan spacer layer
- Finishing with a series of recommended cutters
All the products used in this video are available to order online, including a range of materials to choose from, and a number of accessories/finishing tools.
Break and abrasion-resistant compound material. Hard on one side and soft on the other. The hard side bonds to acrylic. Pre-dried and vacuum-sealed for instant use.
Pressure moulding material made of thermoplastic polyurethane for use with DURASOFT® pd. Forms a robust inner layer of hard/soft splints providing good resistance against discolouration.
Hard-elastic transparent material which bonds to acrylic. No pre-drying required. Ideal for occlusal splints and retainers.
Hard-elastic transparent material which bonds to acrylic. No pre-drying required. With integrated insulation foil.
Perfect for occlusal splints and retainers.
IMPRELON®S pd
A new formulation which is extremely resistant to breaks and abrasions. Pre-dried and vacuum-packed for instant use. Perfect for retention splints and other applications. Currently available to order via email and phone.
Ensures optimum insulation for plaster against acrylic. Best suited as a spacer foil when pressurising hard-elastic material for splints.
SIL-KITT
Transparent silicone, used for blocking out undercuts in pressure moulding splints. Also available in red. Currently available to order via email and phone.
Robust and durable scissors for cutting splints or inserting cuts into splints after pressurising. Available in large or small.
Fine, triangular bur for interdental finishing.
Stable and flexible trimming wheel with extended working time. 3 types of grains with mandrels.
The new school year has started, signaling the end of an exciting summer of sport. Many young people are starting to think about mouth protection, so that they can safely enjoy the sports they love.
Our Autumn offer has now ended, but you can still purchase from our exciting range of blanks and accessories, which combine to create strong, protective shields, ideal for use in both amateur and professional sports.
Bioplast®
SCHEU Bioplast® blanks create fun, creative sports mouthguards that are sure to appeal to younger sportspeople. Made from a soft, pliable rubber material, the blanks are available in an array of bright colours, patterns and flags.
Designed to work with a Scheu machine, the blanks will work equally well with any machine that will take a 125mm diameter blank. You can adapt them to suit your patients’ needs and even layer them to create different thicknesses and colour effects.
BIOPLAST® XTREME
Bioplast® Xtreme blanks feature an integrated, V-shaped reinforced layer, to give extreme protection in the front tooth area. Blanks can be layered to offer even greater protection, if needed.
Xtreme Deco blanks are made using the latest printing techniques to create fun, multicoloured patterns and designs.
For more information, or to place an order, just visit our online shop.
The disappointment felt by the Eurodontic team and course delegates was palpable when our week of new product training events had to be cancelled.
Vague sympathy was expressed for the speaker who had cut his finger off in a DIY mishap a few days before travel, particularly when the initial rumours suggested he had lost several fingers – not just the one.
So now we have a training void and lots of questions being asked about new products from SCHEU Dental.
Our lab JJ Thompson (one of the biggest grumblers) had bought the new LC material and light box and were now sitting looking at the beautifully presented kit wondering where to start.

I asked them to read the accompanying brochure, have a go and report back.
They came back with the following technical report.
After briefly reading the step-by-step instructions we started by taking the contents out of the box, muttering ‘these manufacturers love selling kits, I bet we don’t need half the stuff in here, but the box itself will be good for storage later I suppose.’
One of the main messages we took from our brief scan of the instructions was – ‘it is very important that the base layer is not allowed to flex during manufacturing, flexing will increase the likelihood of the bond between the LC material and the base layer failing’.
The instructions go on to state, ‘the model should be surveyed using a model surveyor to determine undercuts’. We debated this, but decided we ought to be able see undercuts with our trained eye, and from a practical point of view we didn’t have time for this. Perhaps if we had a problematic case we’d use a model surveyor, but for trial purposes we didn’t.
The brochure went on to advise, ‘Using red Silkit or other blocking out product – block out the undercuts’. We usually block out with plaster, as it’s cheaper and quicker, but feeling duty-bound to follow at least one of the instructions, we used red Silkit.
It was actually quite a nice product. We do use the clear Silkit whilst manufacturing snoring appliances, but we hadn’t used the red. Our experience with Silkit is that it doesn’t stick to wet models so you do have to make sure the models are prepared in advance. The material is a bit fiddly and very sticky but after blocking out undercuts on two or three teeth it got easier and it was nice to be able to see really clearly where we had worked. Bearing in mind our failure to follow the instruction about surveying the model, we blocked out heavily.
One advantage of using Silkit is that it can be removed from the model after appliance production – however it does leave a red stain.
Silkit – 8/10
Once the models had been blocked out we put on the Isofolan layer and then a Duran 1.5mm layer. SCHEU recommend a minimum thickness of 1.5mm to avoid flexing. We didn’t follow this instruction right from the start as 1.5mm seemed too thick. But after opting for the 1mm it did indeed flex too much. So we chalked that one up to experience and used the 1.5mm as instructed.
The excess 1.5mm Duran material was removed to make it easier to work, and following the instructions we roughened the baseplate up with a course brown Dimo wheel. This is quite an important step, as the shiny surface has to be removed to prepare for bonding and the roughening up has to extend further than the appliance margins. A bit of time has to be taken here going round gingival margins and intercuspid crevices.

When this step is complete, we wiped the surface over with an alcohol wipe to remove fingerprints and dust before painting with primer. We put our gloves on at this stage to prevent touching the freshly prepared surface with our fingers. A thin layer of primer
was painted on the appliance. It was easy to see where we had painted as we were
now putting the gloss back on the baseplate. Again, the primer needs to be extended further than the appliance margins.
The primed appliance went in the lightbox for 5 minutes. We had purchased a new SCHEU lightbox for this as we only had a very old Triad and no one could find the instruction book to see what the spectral range was. We were pleasantly surprised by our new lightbox. It had typical SCHEU styling, was lightweight and according to SCHEU Dental had enough space for two models. Actually, we put four in the box, and they were high models on articulated bases and still the LC material cured well.
Lightbox – 10/10
When you receive the lightbox you have to put the bulbs in yourself. It comes with white and blue bulbs and they have to be positioned alternately (read the instructions!) If you look in the box while it’s curing, it does look like the white ones aren’t working – they are, you just can’t see them. The good thing is they are not hideously expensive special bulbs that have to be ordered from SCHEU – you can buy them online, so keep the packaging as you will need it when replacing.
We removed the primed and cured baseplate from the lightbox with gloved hands and eagerly opened our little black box of LC material. It wasn’t until we noticed the material sticking to our gloves that we remembered that little pot of insulating cream in the kit box. Oops. It’s essential to use this on your gloved fingers. If you are using opposing models to make indentations you can also use the cream as a separator by brushing on the occlusal surfaces. Alternatively you can soak opposing models in water if they are able to be removed from the articulator – as soaking in water works just as well.
Insulating cream – 7/10. A good product but the pot is rather small.
The Durasplint LC material is quite expensive when compared to conventional resins so you need to think about how you are using it. If you are intending to make a thick appliance, use a thicker baseplate. The LC material must be moulded to give a thin coverage over the whole of the appliance and just beyond the margins. You shouldn’t try to just stick a block or a ramp to the baseplate as the joins will be visible and weak and the bond will fail on the join. Whatever you choose to build can be shaped to finish using your gloved fingers and clean tools. The more effort you put in here, the less trimming you will need to do.
After curing your appliance for 20 minutes you should wipe it over with alcohol again to remove sticky residue. If you forget this and go straight to trimming, your trimming burs will be clogged up within seconds. You should do as much trimming as possible whilst the appliance is on the model and cut the appliance to its intended depth before attempting to remove from the model – it’s all to prevent flexing of the baseplate.
The two cutting burs included in the kit are nice quality burs and can be bought singly. The LC material is hard, like all light cured acrylic, and produces a very fine dust. Bur marks are not easy to remove and we did have to use a brown Dimo before our appliance was smooth enough for polishing.
Burs – 10/10. We use a similar larger bur in the lab already, but rarely use the thin version. We need to compare prices of the single burs to see if it’s worth changing to these.
The polish and polishing wheels included in the kit look great, but we had access to a lathe with pumice and polish and our impatience was too great to ignore, so we finished our appliances on the big lathe. After polishing we went back and put a bit more shape on the appliance edges, so we did end up giving the polish bars and polishing wheels a try. The results were better than expected, but we didn’t use them enough to give a rating.
LC material – 9/10. A bit expensive when compared to building up with a cold cure resin, however it gives a beautifully light, smooth and clear appliance which the manufacturers claim is highly resistant to discolouration. It seems to offer qualities similar to heat curing but at a fraction of the time.
The kit comes with a cannula of light curable Clear Blokker which is the new clear version of SCHEU Blue Blokker. Unlike the blue version, this clear material has been passed for intra-oral use and it will bond with the Duran baseplate and Durasplint LC material. It’s intended for fine repairs or adjustments, and obviously the appliance has to be prepared and primed before adding any additional LC material or Clear Blokker.
SCHEU LC complete kit – 9/10 . Overall the kit was very good. It wasn’t just a pretty box – it was full of essentials, and it did include an essential step-by-step guide, if only we technicians had the patience to read it! However, it could have included brown Dimo wheels as these were pretty essential too.
For those of you wondering about the fate of the speaker, he did have his digit reattached and is now making a full recovery. We hope to bring you the new product course in 2016.